Go to the AI Product Feed for UnoPim helps businesses create structured product feeds from UnoPim that OpenAI can read.
This module allows you to map attributes, generate feeds in TSV or JSON format, and publish them via secure, token-protected URLs.
This guide walks you through each step of configuring feed settings, mapping attributes, creating a product feed, and submitting URLs to OpenAI.
- UnoPim 1.0.0 virtual machine with the OpenAI Feed package installed.
- For UnoPim installation, make sure your server meets these system requirements.
- OpenAI / ChatGPT Merchant Account for feed delivery.
- Generate ChatGPT compatible product feeds from UnoPim in TSV or JSON format.
- Protect feed access using cryptographically secure token-based URLs.
- Map UnoPim product attributes to OpenAI feed columns via a simple admin interface.
- Trigger feed creation manually from the admin panel at any time.
- Generate feeds on demand from the command line using Artisan CLI commands.
- Print the authenticated feed URL directly from the CLI using the –show-url flag.
- Monitor the last 5 feed creation attempts with real-time status polling in the dashboard.
- Process large product catalogs in configurable batches to prevent memory errors.
- Set target country and storage country for geotargeting AI product listings.
Follow the steps below to install OpenAIFeed Connector on UnoPim.
Step 1: Extract the Extension
Unzip the extension package and combine it package folder into project root directory.
Example structure:
/your-unopim-project
└── package/
Step 2: Register Service Provider
Open file: config/app.php
Add the following line below providers arrangement
Webkul\OpenAIFeed\Providers\OpenAIFeedServiceProvider::class,
Step 3: Register PSR-4 Auto Loading
Go to project level composer.json and add the following entry below psr-4 part:
"Webkul\\OpenAIFeed\\": "packages/Webkul/OpenAIFeed/src"
This ensures Laravel/PHP can load connector classes automatically.
Step 4: Run the Setup Command
Run the following command from the project root directory.
composer dump-autoload
php artisan migrate
php artisan openai-feed:install
php artisan optimize:clear
Note: For UI theming, run npm command inside packages folder: packages/Webkul/OpenAIFeed
npm i && npm run build
You can delete node_modules after installation.
Once the package is installed, the connector appears in the left sidebar of your UnoPim admin panel.
How to Use UnoPim AI Product Feed for openAI search
Once the package is installed, the connector appears in the left sidebar of your UnoPim admin panel under the OpenAI Feed label.
Admin Panel → OpenAI Feed
Clicking on OpenAI Feed will expand two sub-menu items:
Step 1 — Configure General Settings
Go to OpenAI Feed → Configuration. This section controls the behavior of the core feed. Fill in each column, then click Save Settings in the top right corner.
Feed Status: Toggle Feed Enabled to enable the feed. If disabled, the feed URL does not return data even though it has been sent to OpenAI.
Decoy Security Token : Click Generate Token to generate a cryptographically secure access token. This token is added to your feed URL as a query parameter.
Format : Select your preferred feed format from the dropdown:
- TSV — Tab Separated Values: Recommended by OpenAI for ChatGPT Search.
- JSON: Available for broader AI platform compatibility.
Channels & Local : Select the Channel and Locale that corresponds to the storefront you want to appear in the feed.
Currency : Enter the ISO 4217 currency code for your price (e.g. USD, EUR, GBP). This must match the currency configured on the selected channel.
Store / Brand Information: Add Seller Name And Seller URL.
OpenAI Trading Flags : The right side panel contains additional OpenAI specific settings:
- Eligible for ChatGPT Search: Enable this to allow products to appear in ChatGPT search results.
- Eligible for ChatGPT Checkout: currently our connector does not allow this, therefore requires is_eligible_search = false .
Geography & Targeting (Right Panel)
- Target Country: ISO 3166-1 alpha-2 country codes, separated by commas (for example, US, GB, CA).
- Store Country: The country where your store is located (e.g. US).
Click Save Settings before moving to the Configuration tab.
Step 2 — Attribute Mapping & Configuration
Go to OpenAI Feed → Configuration. This is where you connect your UnoPim catalog attributes to the fields that OpenAI expects in the product feed.
Attribute Mapping
OpenAI requires specific field names in its product feed. Your UnoPim catalog uses your own attribute codes.
The mapping interface bridges the two. For each OpenAI field, select the appropriate UnoPim attribute from the dropdown menu.
| OpenAI Field | Internal Code | Map to UnoPim Attributes | Required |
| Product Title | title | name / product_name | Required |
| Information | information | description / short_description | Required |
| Brand | brand | brand/manufacturer | Required |
| Price | price | price / retail_price | Required |
| Image Attributes / Gallery | picture | base_image / gallery_image | Required |
| Sale / Special Price | selling price | special_price / sale_price | Optional |
| Heavy | heavy | heavy | Optional |
| Unit Weight | unit_weight | weight_unit (e.g. kg, lb) | Optional |
| Color | color | color | Optional |
Map minimum: Product Title, Description, Brand, Price, and Image. Required fields cannot be left blank.
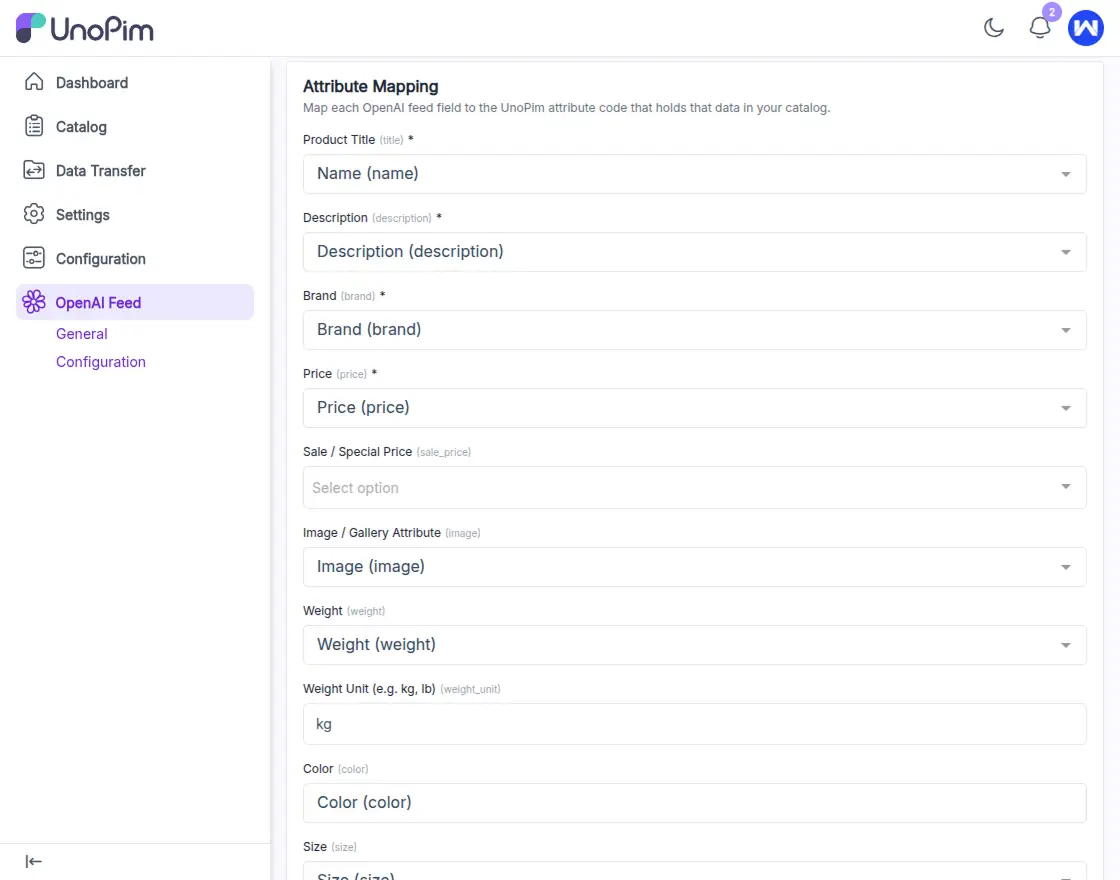
Save Settings after completing all attribute mapping and configuration fields.
Step 3 — Generating Your Product Feed
Once your settings and attribute mappings are saved, you’re ready to create your feed. There are three ways to trigger feed generation:
Option A: Manual Creation from Admin Panel
- Go to OpenAI Feed → General in the admin panel.
- Click the Earn Now button.
- The dashboard will display the status of creation efforts in real time.
- Once complete, the feed file is ready at a secure, token-protected URL.
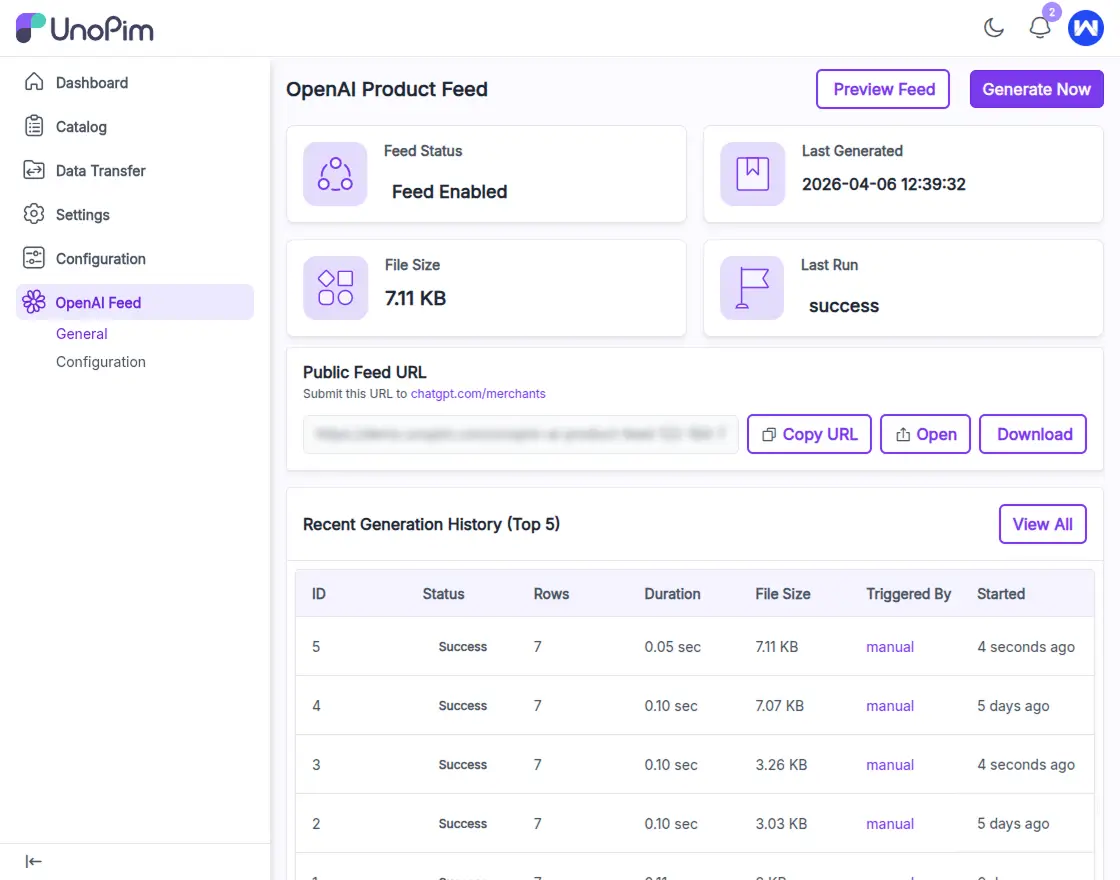
The dashboard shows the last 5 generations of efforts with timestamps and status. Use this to confirm success or identify failure.
Option C: CLI Creation
Generate feeds on demand from the command line:
php artisan openai-feed: generate
To generate a feed and print authenticated public URLs in the terminal:
php artisan openai-feed:generate –show-url
Copy the output URL — this is the URL you send to OpenAI.
Step 4 — Retrieving Your Feed URL
Once the feed is created, you can retrieve the secure feed URL in two ways:
From Admin Panel
- Go to OpenAI Feed → General.
- After successful creation, Download Feed button and Copy URL button appear in the dashboard area.
- Click Copy URL to copy the token-authenticated feed URL to your clipboard.
From CLI
Run the following command from your server:
php artisan openai-feed:generate –show-url
The full URL including the security token is printed to the terminal.
The feed URL format is: — token parameter authenticates the request to OpenAI.
Step 5 — Submit Feed URL to OpenAI
Once your feed URL is ready, submit it to OpenAI to make your product visible in OpenAI Search.
- Log in to your OpenAI Merchant account.
- Navigate to the Product Feed or Shopping settings section.
- Paste your token-authenticated feed URL into the feed submission field.
- Select TSV as the feed format (or JSON if that’s what you created).
- Save and submit the feed for OpenAI review.
OpenAI will crawl and index your feed. Once approved, your products will start appearing in ChatGPT search results for relevant queries.
Step 6 — Monitoring Feed Status
The admin dashboard records every feed creation attempt. Navigate to OpenAI Feed → General to see the status panel.
The dashboard shows the last 5 attempts. Each row displays the build method (manual, cron, CLI), timestamp, and result status.
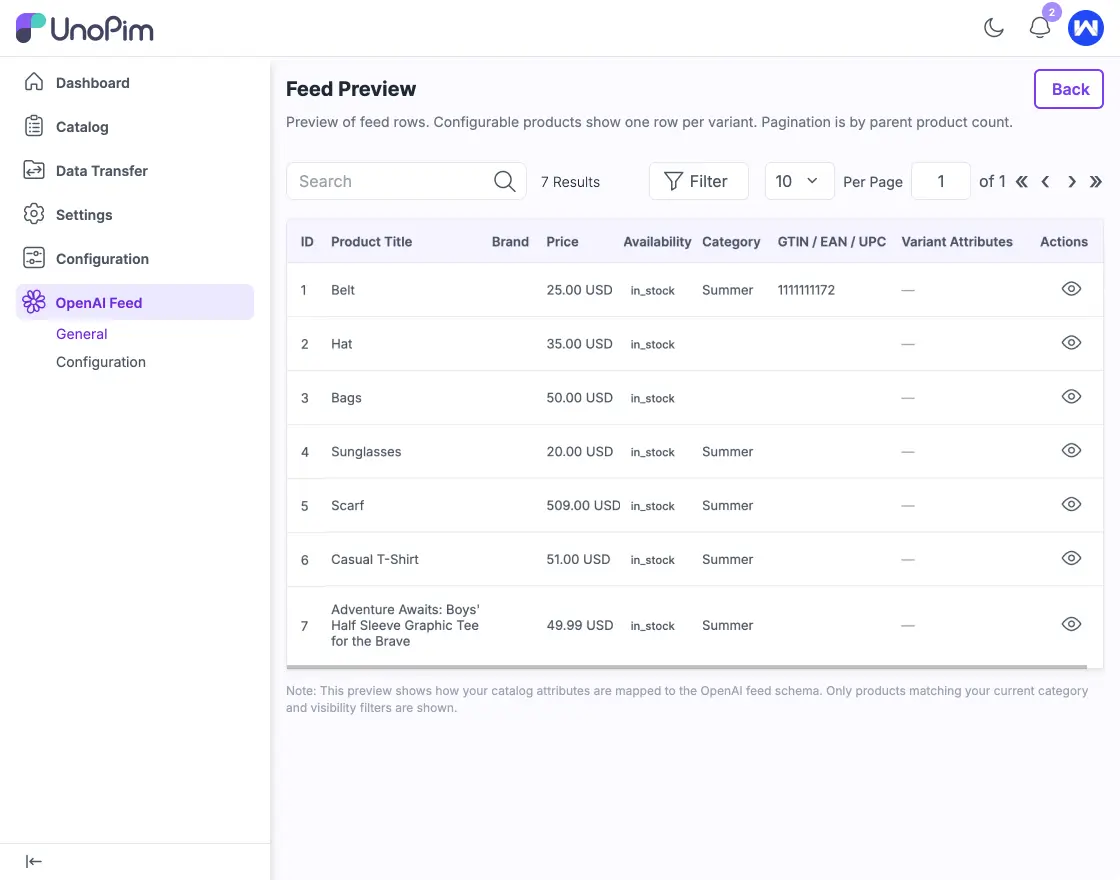
Step 7 – Feed Preview
From Admin Panel
- Go to OpenAI Feed → General.
- Click Feed Preview.
This is all about the UnoPim AI Product Feed Connector. I hope you get an idea about our module. Thank you for taking the time to read this blog.
And also, don’t forget to share your feedback and suggestions in the comment box provided below.
Additionally, If you have any questions or suggestions, please add a ticket in our HelpDesk system or contact us at [email protected].
Current Product Version – 1.0.0
Supported Framework Version – 1.0.0

PakarPBN
A Private Blog Network (PBN) is a collection of websites that are controlled by a single individual or organization and used primarily to build backlinks to a “money site” in order to influence its ranking in search engines such as Google. The core idea behind a PBN is based on the importance of backlinks in Google’s ranking algorithm. Since Google views backlinks as signals of authority and trust, some website owners attempt to artificially create these signals through a controlled network of sites.
In a typical PBN setup, the owner acquires expired or aged domains that already have existing authority, backlinks, and history. These domains are rebuilt with new content and hosted separately, often using different IP addresses, hosting providers, themes, and ownership details to make them appear unrelated. Within the content published on these sites, links are strategically placed that point to the main website the owner wants to rank higher. By doing this, the owner attempts to pass link equity (also known as “link juice”) from the PBN sites to the target website.
The purpose of a PBN is to give the impression that the target website is naturally earning links from multiple independent sources. If done effectively, this can temporarily improve keyword rankings, increase organic visibility, and drive more traffic from search results.