UnoPim Supplier Data Portal is a web-based Unopim module that allows businesses to collaborate with multiple suppliers and manage product data through a controlled approval process.
Suppliers can log in to the portal to create or import products, which are submitted for review.
Authorized admins or supplier handlers can review, approve, or reject products—individually or in bulk.
Rejected products can be refurbished and sent back by the supplier. Once approved, products are published directly to the UnoPim catalog, ensuring secure, efficient and centrally controlled supplier data management.
Additionally, you can also check UnoPim Builder Checker Connector to manage product data using the manufacturer-inspector approval workflow within UnoPim.
- This module works with UnoPim version v1.0.0
- Node and Yarn packages need to be installed.
- For UnoPim installation, make sure your server meets these system requirements.
- Dedicated Supplier Login Portal – Suppliers access UnoPim via a separate login URL to create or import product data.
- Supplier Specific Attribute Family Assignment – Attribute groups are assigned at supplier account creation, ensuring suppliers only work with relevant product attributes.
- Review-Based Product Workflow – All products held by suppliers automatically move to the review stage before appearing in the UnoPim catalogue.
- Single and Bulk Product Approvals – Admin or supplier control user can approve products individually or in bulk to handle large product volumes efficiently.
- Product Disclaimer with Comments – Products can be rejected with comments, so that the supplier can clearly understand the necessary corrections.
- Supplier Dashboard with Status Tracking – Suppliers can track approved, rejected and pending products along with a set of defined attributes from a single dashboard.
- Reshipment Workflow for Rejected Products – Suppliers can update rejected products and resubmit them for review without creating new entries.
- Centralized Supplier Management – Admins and supplier controller users can manage supplier accounts, approvals and activities from a single point of control.
Manual Installation
Follow the steps below to install Supplier integration:
1. Merge Extension Files
- Unzip the Supplier extension package.
- Combine
packagesfolder into your project root directory.
2. Register Service Provider
- Open
config/app.php. - Add the following line to
providerspart:
Webkul\Supplier\Providers\SupplierServiceProvider::class,
3. Update Composer Autoloading
- Open
composer.jsonsubmit. - Add the following line below
psr-4part:
"Webkul\\Supplier\\": "packages/Webkul/Supplier/src"
4. Optimize and Clear Cache
Run the following command:
composer dump-autoload
php artisan optimize:clear
5. Supplier Table Migration
To migrate all Supplier related tables, run:
php artisan migrate
6. Admin Package Creation
Notes: Supplier package icons are provided within the ZIP file.
- Copy logo_supplier.svg and dark_logo_supplier.svg from the unopim-supplier-logo folder.
- Make sure to paste these icons in the correct resources/assets/images directory of the Admin package.
- Also need to add an updated logo for the Supplier dashboard page this logo into Supplier Assets.
icon-supplier-approved.svgicon-supplier-pending.svgicon-supplier-reject.svg
Build an NPM asset to display the Supplier package logo:
npm install
npm run build
7. Creation of Supplier Packages
Build NPM assets for Supplier UI:
npm install
npm run build
Configuration Update
8. Update audit.php (Unopim Core)
- File Path:
config/audit.php - Update the following configuration block:
'user' => [
    'primary_key' => 'id',
    'foreign_key' => 'user_id',
    'model'       => null,
    'resolver'    => OwenIt\Auditing\Resolvers\UserResolver::class,
    'guards'      => [
        'admin',
        'supplier',
    ],
],
9. Update auth.php (Unopim Core)
- File Path:
config/auth.php - Update the following sections:
10. Publish Supplier Service Providers
Publish Supplier UI assets by running:
'guards' => [
    ...
    'supplier' => [
        'driver'   => 'session',
        'provider' => 'suppliers',
    ],
],

'providers' => [
    ...
    'suppliers' => [
        'driver' => 'eloquent',
        'model'  => Webkul\Supplier\Models\Supplier::class,
    ],
],

'passwords' => [
    ...
    'suppliers' => [
        'provider' => 'suppliers',
        'table'    => 'supplier_password_reset',
        'expire'   => 60,
        'throttle' => 60,
    ],
],
php artisan vendor:publish
When prompted, select SupplierServiceProvider from the list.
11. Add Middleware Supplier Group
To properly handle supplier-specific sessions, CSRF protection, and route binding, you must register a custom middleware group for the supplier.
📍 File Location
app/Http/Kernel.php
Step 1: Register supplier.web Central Device Group
Add the following entry to $middlewareGroups arrangement:
'supplier.web' => [
    \App\Http\Middleware\EncryptCookies::class,
    \Illuminate\Cookie\Middleware\AddQueuedCookiesToResponse::class,
    \Webkul\Supplier\Http\Middleware\SupplierSession::class,
    \Illuminate\Session\Middleware\StartSession::class,
    \Illuminate\View\Middleware\ShareErrorsFromSession::class,
    \App\Http\Middleware\VerifyCsrfToken::class,
    \Illuminate\Routing\Middleware\SubstituteBindings::class,
],
This middleware group reflects the default web pile while introducing the dedicated Supplier Sessions middleware to isolate supplier authentication and session state.
Step 2: Register Supplier Middleware Alias
Next, add the supplier middleware alias to $middlewareAliases arrangement:
protected $middlewareAliases = [
    // ...
    'supplier.session' => \Webkul\Supplier\Http\Middleware\SupplierSession::class,
];
This alias allows SupplierSession middleware to be reused independently when necessary.
Notes
- That
supplier.webgroup must be used for all supply routes - This setting ensures:
- Isolated supplier session
- Proper handling of CSRF
- Clean separation of admin and customer context
How to Use the UnoPim Supplier Data Portal
Step 1: Create a Supplier Controller Role
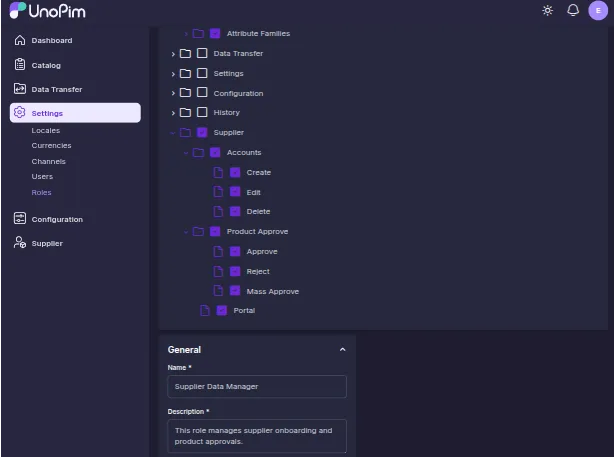
Navigate to Settings → Roles → Create Role and create new roles based on your business needs.
Set Habit permission to enable users to:
- Create, edit, and delete supplier accounts
- Access supplier portal management
- Approve, Bulk Approve, or reject supplier products
- Access the product approval page
- Access UnoPim main dashboard
- Access Catalog.
Save the role after granting the required permissions.
You can also manage your Suppliers as super admin.
Step 2: Assign Role to Unopim Handler User
Create a new user or update an existing user and assign the newly created user Supplier Data Manager role.
This user will be responsible for managing suppliers and reviewing product data.
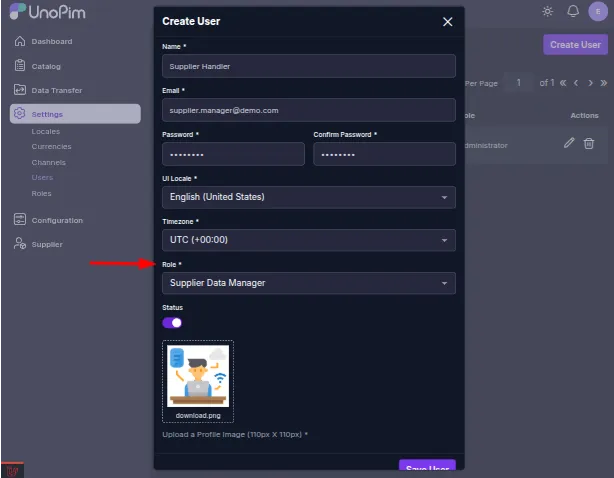
The image displays all UnoPim users who have been granted permission to manage suppliers.

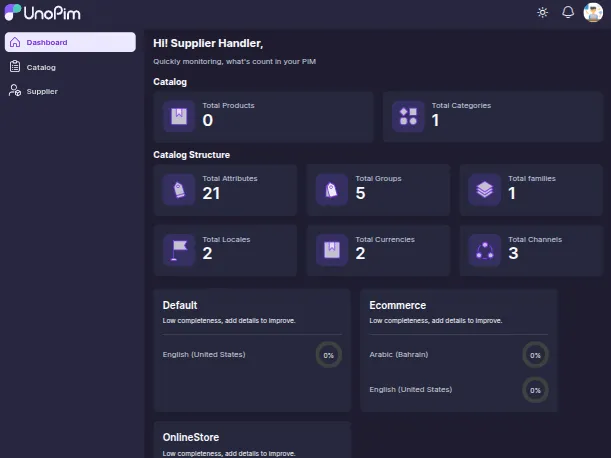
Step 3: Log in as Supplier Controller
Log in using the unopim supplier controller user credentials.
Once logged in, controllers will have access to supplier management, product approvals, and dashboard views.
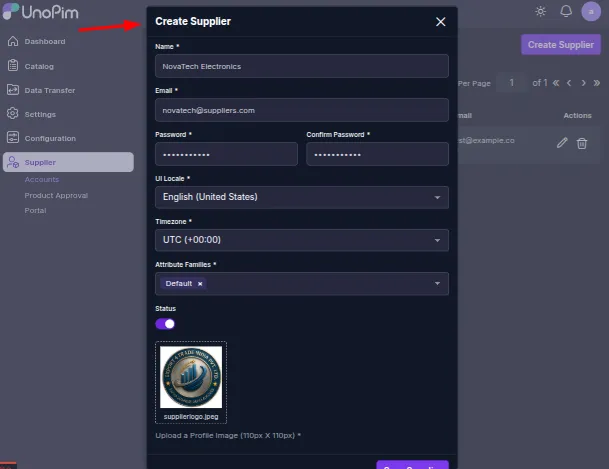
Step 4: Create a Supplier Account
Navigate to Supplier → Account → Create Supplier to make new supplier.
Provide required supplier details, assign family attributesand activate the supplier account.
Repeat these steps to create multiple supplier accounts as needed.
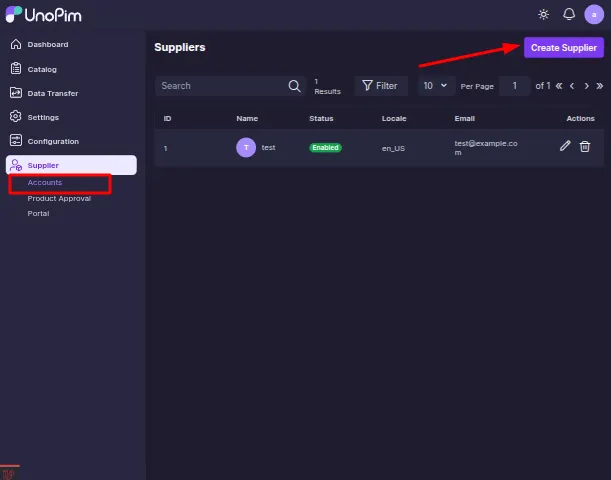
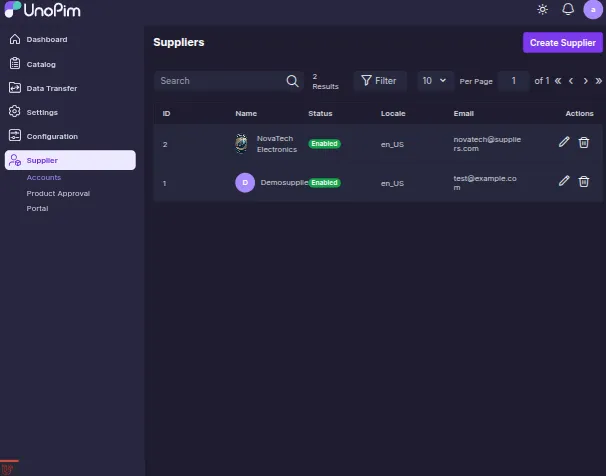
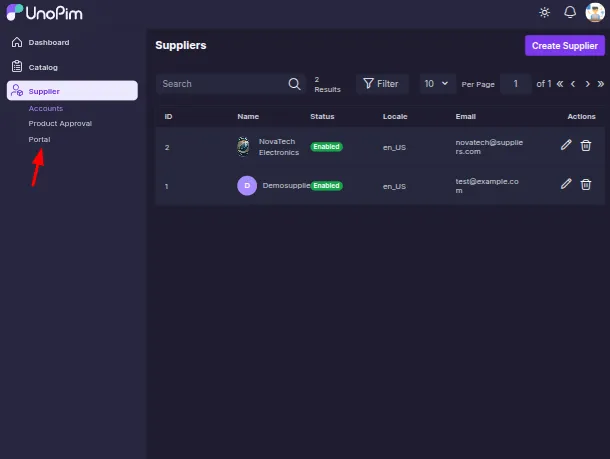
The image above illustrates a supplier account listing in UnoPim.
Step 5: Share Supplier Login Credentials
After creating a supplier account, share it Supplier login URLusername, and password with the supplier.
Supplier will use these credentials to access the Supplier Data Portal.

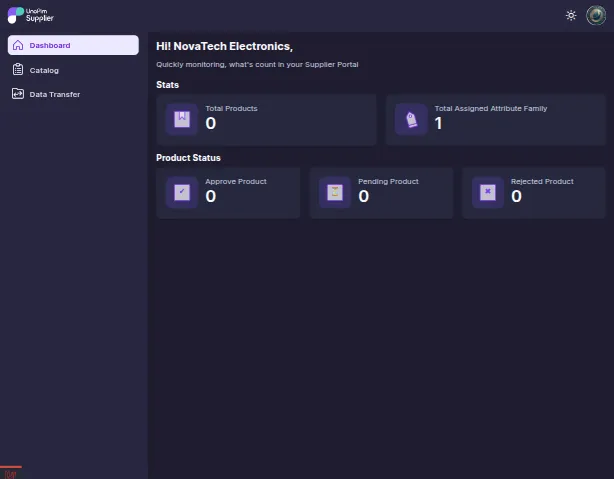
Step 6: Supplier Login and Dashboard View
When a supplier logs in for the first time, the dashboard will display:
- Number of products: 0
- Approved products: 0
- Pending products: 0
- Rejected products: 0
- Assigned attribute groups (as per configuration)
This dashboard updates automatically as product status changes.
Step 7: Create or Import Products as Supplier
Suppliers can create products by clicking Create Products for single entries.
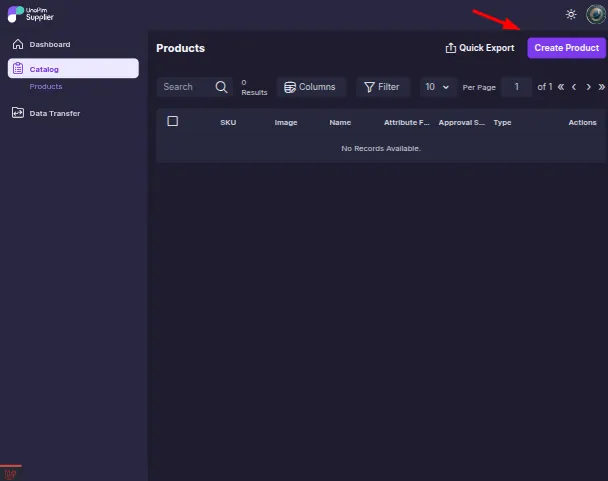
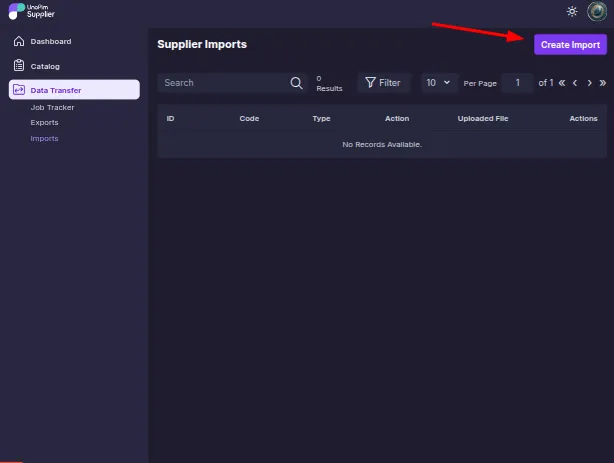
To ship multiple products, suppliers can perform product import tasks and upload them XLS, XLSX, or CSV files and run the import job.
All imported products will be moved to the review stage.
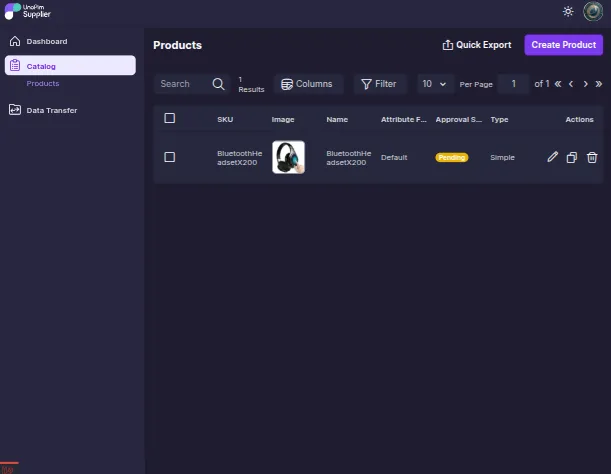
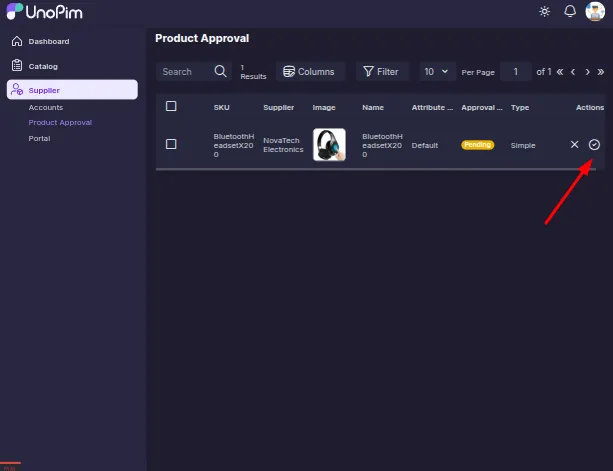
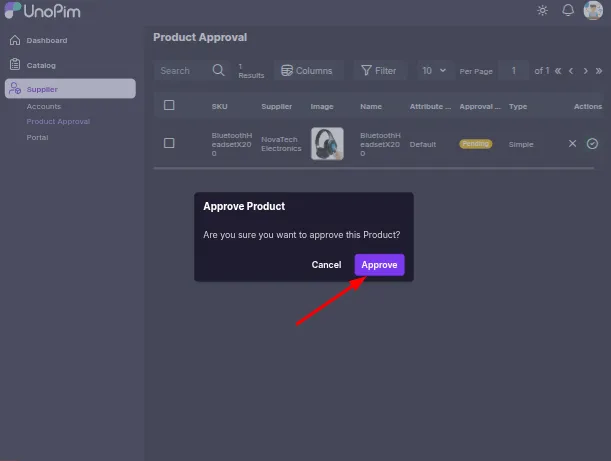
Step 8: Review and Approve the Product
Supplier controller or admin navigates to Product Approval Page to review the delivered product.
Products can be approved:
- One by one
- By opening the edit view and verifying the details
- Use bulk approval for multiple products
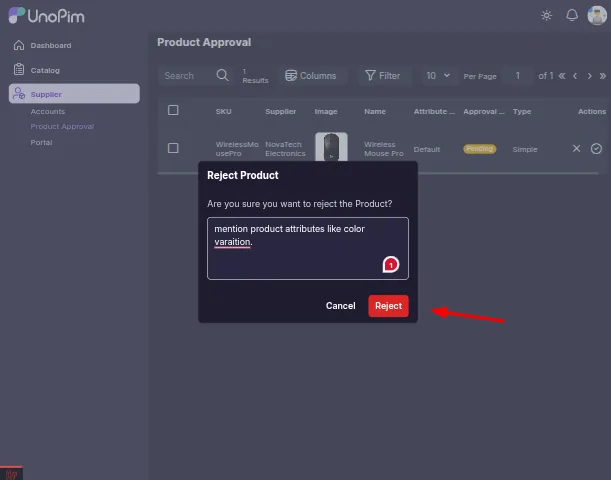
Step 9: Reject Products with Comments
If a product does not meet the requirements, it may be rejected with a comment.
Suppliers will see rejected products and check comments on the product edit page.
Step 10: Resubmission and Final Approval
Suppliers can update rejected products and send them back for review.
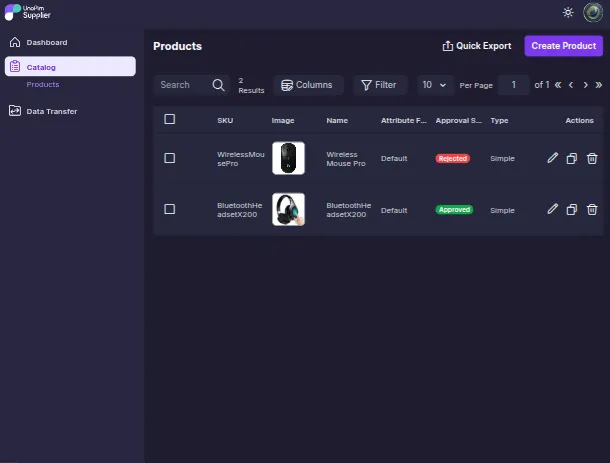
Once approved by the handler or admin, the product appears on UnoPim Catalog Product Page.
The supplier dashboard updates automatically to reflect new product status. The product status will also be updated according to the actions taken by the admin/handler.
That’s all for Unopim Supplier Integration.
Additionally, If you have any questions or suggestions, please add a ticket in our HelpDesk system or contact us at [email protected].
Current Product Version – 1.0.0
Supported Framework Version – 1.0.0

PakarPBN
A Private Blog Network (PBN) is a collection of websites that are controlled by a single individual or organization and used primarily to build backlinks to a “money site” in order to influence its ranking in search engines such as Google. The core idea behind a PBN is based on the importance of backlinks in Google’s ranking algorithm. Since Google views backlinks as signals of authority and trust, some website owners attempt to artificially create these signals through a controlled network of sites.
In a typical PBN setup, the owner acquires expired or aged domains that already have existing authority, backlinks, and history. These domains are rebuilt with new content and hosted separately, often using different IP addresses, hosting providers, themes, and ownership details to make them appear unrelated. Within the content published on these sites, links are strategically placed that point to the main website the owner wants to rank higher. By doing this, the owner attempts to pass link equity (also known as “link juice”) from the PBN sites to the target website.
The purpose of a PBN is to give the impression that the target website is naturally earning links from multiple independent sources. If done effectively, this can temporarily improve keyword rankings, increase organic visibility, and drive more traffic from search results.